So already I've been a little lazy in adding things to this blog, and so far I've only tried one new recipe (though I have been eyeing one very closely which I will try out asap!), and that is a 5 minute delish treat, a cake in a mug!
There are many variations on this creation, but I always lend myself to the infinte knowledge of 'http://www.notquitenigella.com/2009/05/29/the-five-minute-chocolate-mug-cake/' , which is the source of today's recipe! So the essential idea behind it is that you just put a small amount of normal cake ingredients into a mug, and popping it in the microwave. This recipe takes 5 minutes and is a piece of cake! (or should I say a 'mug' of cake? :P)
(Excluding those of you who actually OWN microwaves. I was astonished at how many people didn't own a microwave! How do you eat leftovers and make popcorn? But I digress...)
So there is no massive secret behind the making of this creation, it is as simple as banging them all into a mug and placing it in the microwave for 1 - 1 1/2 minutes on a medium heat, and it's ready to eat!  But please remember!!! This recipe calls for oil, as butter may burn, but do not do this! Oil is such a dominant taste, it really does contaminate the flavour, you can use butter, or better yet, margerine (healthy!). As the butter is in the batter, it will not burn as it cooks. Note: Keep in mind that microwaves vary and I'd begin with just a minute and testing it with a cake tester. It is not very nice when overcooked, so I would lean towards underdoing it, as it will cook slightly in it's own heat even after you remove it.So you can really serve this with anything; icecream, strawberries, a chocolate sauce - it's the perfect snack!
~ "Food for thought is no substitute for the real thing" - Walt Kelly
Good afternoon!
So on Monday the 8th (due to most of the school being absent for whatever reason), assembly was cancelled, and a grade wide picnic was arranged! Despite being warned not to, we indulged ourselves in purely donuts, cake, biscuits, fizzy drink, slice, cupcakes and, of course, vast amounts of chocolate! Each was assigned their own area, being slice, drinks, cake etc., and I was assigned the role of cupcakes (YAY)!Soo because everyone in my tutor group was probably getting tired of my same ol' same ol' butter cupcakes, I decided to stir the mixing bowl a little (:P). Before I begin, however, I would like to point out that all credit goes to Baking Bites at www.bakingbites.com If you would like to try out this recipe, you can search it there :) Alright, so these would have to be the cutest cupcakes I have ever made. Though they didn't turn out as vividly as the ones on the site... well the picture always looks better than the result :P
So here it is.
But I do get the feeling that the reason it didn't turn out as bright as on the site is that I probably used about 1/3 of what they would have, because taste is a big factor here.
I really do hate the chemically taste of over coloured mixture.
Also, as you might be able to pick, the cupcake doesn't really look 'right'. This is probably because because I had to replace butter with vegetable oil, because butter browns the cupcake, which is a great indicator to if the cake is cooked. The brown would have drastically messed with the colours and would not have made it look very good at all.
Also, cooking was very important. I always find it is better to under cook than overcook because even when it's cooling, the heat is cooking it slowly. Because of all the colouring, the consistency was more thin than usual, so I had to make sure that it was cooked just right, because as bad as burnt cupcakes are, gooey ones are worse.
So anyway, the actual making of this cupcake required... patience! I had to split the batter into 5 different bowls and add the colouring to them separately, as well as adding them to the cupcake tin in layers. PHEW! Tough work, as well as the fact that I was panicking that the layers would merge, making a disgusting brownish colour.
As I had said earlier, I had to replace butter with vegetable oil. As healthy as this is, oil is a very dominant taste, and can override any flavour with a nasty oily aura that ruins the sweetness of it all. To my surprise, it didn't turn out AS badly as I had thought, but this is definitely a presentation rather than taste creation.
But I was more than happy to fix this with a large dollop of white icing on the top to accentuate the colours :) I piped this on very easily with a zip lock bag with the corner cut out, to get a nice round shape. I really do hate washing up...
Anyway, this went down very well with my peers in my tutor group, and though I am happy I gave this recipe a try, in all honesty, it's a 8.5/10 for looks and a 4/10 for taste.
So if you want something that is great at first impressions, this is the recipe to try :D Great for kids!
Bye :D Stay tuned for a 5 minute cake creation!
~ "Food for thought is no substitute for the real thing" - Walt Kelly
Ok, so already I am pretty behind on my posts...So I guess I'll knock off three in a row, but in chronological order...Okay, so on the 5th of March was my good friend Anne's birthday, and of course, someone is always designated to bake something. Seeing as cupcakes are kind of my trademark, I decided to go with something new.This is the hazelnut cupcake, and it is your run-of-the mill butter cupcake, but with some hazelnut meal in with it. This does add a bit of a texture, but I've never really been much of a nut person. However, the this is quite subtle and great for an afternoon tea or birthday!  The icing is something quite new to me. I found it a little heavy myself, but the taste just can't be compared. It was quite simple, really. 750g of Nutella (I bought the 'hazelnut spread' brand because there really is no difference - especially with cooking) and some whipped cream. I found that the thickness of each of these ingredients clashed just a bit, weighing down the whole fluffiness of the cupcake. Again, due to the whipped cream, folding is a necessity to keep all the air in the mixture. But after all this, I added a splash of hazelnut frangelico, which really did give the whole flavour something else. Just a touch really does compliment the whole taste. I do love piping tubes, and as you can see here, I've used a 9 pointed star to pipe.
Unfortunately, due to the consistency of the Nutella, and how folding is not a fantastic combining method, there were small parts where the cream had not mixed with the Nutella, so I got small lumps of it throughout, which made it hard to pipe. With piping, if there is a clog, you really cannot just push it through. Not only will this break the bag, but if you do manage to squeeze it through, you will end up with a pile of icing over the cupcake. After much changing around, I ended up with a very thick piping head, about the size of a 5c coin so the mixture could get through. I do prefer fine detail, but this was something that really couldn't have been helped. Anyway, at the end, I just placed some cachous all around (I love cachous, they are amazing, they just add so much more interest to the overall look, plus add something to each bite!) Again, full credit goes to the Crabapple Bakery book mentioned in the 50th birthday cake post. I do not take credit for this recipe, nor can I post it here. If you would like to borrow the book from me, that would be okay. So, yeah, just bang a candle in the top and start singing! Bye for now :)~ "Food for thought is no substitute for the real thing" - Walt Kelly
Good afternoon!Alright, so today, instead of doing work, I am going to post what I baked for my mum's 50th birthday! Yay :D So, this is by far the most detailed thing I have made to date, so there will be many pictures, and a step by step instruction on what I did. Okay, first thing's first. This is the Crabapple Bakery Cupcake Book by Jennifer Graham. This is where I got the recipe, credit for the recipe goes to her, I didn't make it. I believe I actually owe my life to this book. It's amazing...
Ok, so on the right, you can  see I just made two cakes for the layers. Note: these aren't vanilla or butter cakes, the recipe calls for a specifically white chocolate cake, but I suppose a butter cake might balance out nicely with the amount of white chocolate I used later on. Overall, I found the cake a little too sweet, but of course that just means that it'll last longer! :)Ok so now that the base is
  done, I began on the best part, the icing and decoration :PThis to the left is just the unmelted cream and white chocolate ganache that will be the base for most of the icing. Make sure to put into a double saucepan and melt them together. Leave it to cool slightly, then run a handheld beater through it to thicken it up a little!
 So here on the right you can see the chocolate seashells (mostly because I didn't feel like paying $20+ for Guylian chocolate), I just melted some milk into a seashell mold I have from ages ago. Looks nice and tastes just as good ^_^
I just popped these bad boys into the fridge for 30 minutes, and voila, seashells!So next, the middle of the cake calls for some ganache and crushed  up Maltesers to give a little texture and crunch to the cake. Just use a meat tenderiser (Make sure you do this outside!) and mash them up. Add to ganache and fold. Folding is designed to combine ingredients without knocking air out of the mixture, so use a flat instrument, a rubber spatula is best.
 Ok, I just placed this on the base cake, making sure not to have bits sticking out the sides as it'll interfere with the crumb coating later on. You'll notice that there are some crater like things on the top layer. This was just air bubbles in the baking as I put down a paper lining rather than a greasing, just to make getting it out easier. Anyway, you've not pretty much finished the core of the cake! Now onto decorating!
 Ok, so this is what the crumb coat looks like. You can see that I have filled up the craters with ganache, so it's alright now.
What is a crumb coat? Pretty much it's a bakers trick to make icing much easier, but trapping the actual cake under a layer of icing, so bits of crumbs don't show up when the final icing layer is done. I set this aside in the fridge for 30 minutes so it could set, and now icing will be much easier! Note: This is really only needed for big cakes where presentation is key.
 So while that is setting, I started on some more of the decorations! The top of the cake needs a plaque of sorts to write a little message on or something, and you can buy these at bakeries, and they look really pretty, but I decided for the homemade approach. This is actually a tartlet tray, but I used it because it has a push up bottom that makes it easy to lift out. Make sure to take GREAT care when lifting this out, as a piece snapped off, and as I was out of white chocolate, I just glued it back together with white write on fudge icing (you can buy this at any grocery store) and I just left it in the fridge. It seemed ok, and wasn't very noticeable.
 Alrighty, so the crumb coat is out of the fridge and the final coat of ganache was placed on. It does take a while to get smooth, but I find that some knife marks actually look quite nice and add a bit of interest to the cake.
You can also see the end of a piping bag. I LOVE piping bags. A relative of mine gave me a whole bunch of cooking stuff, among them a wide variety of piping bag heads. I used a star shape for this one, for a lined effect. Circular blobs also look very nice, and can be made easily by cutting a small hole in the corner of a large zip lock bag, and piping icing out from there. Anyway, I just put them all around the base of the cake which adds a polished touch to it in the end and covers up  the straggly bits down the bottom of the cake.
Ok you can see it here, and I've also decided to decorate it on the platter that I'm going to serve it on. I recommend this so you don't ruin any of the decoration in transferring it.
 So now just some touches are going to be put on it.
I put the seashells ontop of the cake and stood them up facing the front with little blobs of icing, as well as the ones around the side which are fixed on with more icing.
 Before I started making the cake, I had bought a chocolate coloured ribbon to tie around the end, so make sure you leave room between the blobs around the base and the seashells. This 'ties' (haha get it?) the piece together and strengthens the milk colour against the white.I also fixed the plaque onto the top, again putting a little blob underneath it to face it towards the front.
  Cachous are so cool. I love them to death, they make any product shine :) It's really good also to add a bit of a backround interest to the layout of the cake, theyre really fun :)
(If you don't know what cachous are, I'm sure you've had them - they are the little metallic edible balls that crunch and are often put on things like cakes and baking stuff) Note: You can buy these at any supermarket in a little container, really easy to find.
Soo, I had a little touch of difficulty with the plaque. The recipe calls for me to melt milk  chocolate and put it in a piping bag and write on it. I tried this, and unfortunately the chocolate hardened as I was squeezing it! It was pretty terrible, and I was at pretty much boiling point here, I had worked so long on it. Anyway, I thought to write out the message with white fudge write on icing, which normally wouldn't have shown up, but then I placed cachous all along the fudge so it would stick, and, lo and behold, it looked good :D
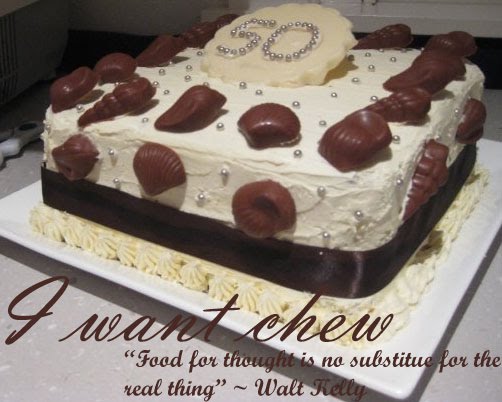
So there it is. The finished project. Production time: About 6 hours.
So, if you do want to have a crack at this recipe, email me and I'll send you the recipe, or I can just lend you the book. But you have to pretty seriously commit to it, it is a big project. I was so proud of it, and still am.
And it tasted. De-licious.
 So there it is. The longest post I think I will ever make! Have a good week!
~ "Food for thought is no substitute for the real thing" - Walt Kelly
 Good evening, all! Though my piece de resistance is yet to be posted (I shall do so soon, it's a big task!), I am going to share with you the tiramisu I made for my dads birthday last September!
I'm not SO great at remembering, but since I had posted it on facebook, me from the past was kind enough to write down what I had done...
Alrighty, here is the basic layering structure, going from top to bottom:
- Grated dark chocolate
- Ricotta cheese/chocolate/vanilla extract/icing sugar
- Espresso and brandy soaked in finger biscuits
- Cream
- Ricotta cheese/chocolate/vanilla extract/icing sugar- Espresso and brandy soaked in finger biscuits- Cream- Ricotta cheese/chocolate/vanilla extract/icing sugar
PHEW! Wow, I forgot how detailed that thing was!
Anyway, I just chilled it and served! Very nice but perhaps I had used too much brandy. It can be a touch too bitter, but if you're into that kind of thing, then pour away!
Usually, I'll post the recipe and cite where I got it from, but for this, I really have no clue, it was too long ago... I will however try to find it if anyone wants a crack at it, so stand by!
Anyway, tiramisu can be done in a whole bunch of ways, but that was just my go at it!
Alrighty then, have a good evening! More to come!
~ "Food for thought is no substitute for the real thing" - Walt Kelly
Well, well well, where to begin?This being my first post on this blog, I am a little disoriented as to what exactly I should be writing here, but as a jumping off point, presumably the people who are going to be reading this blog (fingers crossed!) already know me, so I'm not going to dwell on who I am.Rather, I'd prefer to talk about what this blog is all about.Sadly for you, my dear public, I will not be presenting you with inane ramblings from the deepest crevice of my mind, rather I will be posting as frequently as possible, the phenomenal and marvelous world of my kitchen.
Though this is a hobby-blog, I intened to share with you my particularly interesting culinary creations and show you how I made them!
So, that's all for now, as I really should be working on an essay, but fear not, I shall come again in a little while and show you some of my previous works that I was smart enough to document (sadly, many I did not think to photograph...), and take my first step into the world of blogging!
See you soon!
~ "Food for thought is no substitute for the real thing" - Walt Kelly

 But please remember!!! This recipe calls for oil, as butter may burn, but do not do this! Oil is such a dominant taste, it really does contaminate the flavour, you can use butter, or better yet, margerine (healthy!). As the butter is in the batter, it will not burn as it cooks.


