Alright, so today, instead of doing work, I am going to post what I baked for my mum's 50th birthday! Yay :D So, this is by far the most detailed thing I have made to date, so there will be many pictures, and a step by step instruction on what I did. Okay, first thing's first.
 This is the Crabapple Bakery Cupcake Book by Jennifer Graham. This is where I got the recipe, credit for the recipe goes to her, I didn't make it. I believe I actually owe my life to this book. It's amazing...
 Ok, so on the right, you can
 see I just made two cakes for the layers. Note: these aren't vanilla or butter cakes, the recipe calls for a specifically white chocolate cake, but I suppose a butter cake might balance out nicely with the amount of white chocolate I used later on. Overall, I found the cake a little too sweet, but of course that just means that it'll last longer! :)
Ok so now that the base is
 done, I began on the best part, the icing and decoration :P
This to the left is just the unmelted cream and white chocolate ganache that will be the base for most of the icing. Make sure to put into a double saucepan and melt them together. Leave it to cool slightly, then run a handheld beater through it to thicken it up a little!
 So here on the right you can see the chocolate seashells (mostly because I didn't feel like paying $20+ for Guylian chocolate), I just melted some milk into a seashell mold I have from ages ago. Looks nice and tastes just as good ^_^
I just popped these bad boys into the fridge for 30 minutes, and voila, seashells!
So next, the middle of the cake calls for some ganache and crushed
 up Maltesers to give a little texture and crunch to the cake. Just use a meat tenderiser (Make sure you do this outside!) and mash them up. Add to ganache and fold. Folding is designed to combine ingredients without knocking air out of the mixture, so use a flat instrument, a rubber spatula is best.
 Ok, I just placed this on the base cake, making sure not to have bits sticking out the sides as it'll interfere with the crumb coating later on. You'll notice that there are some crater like things on the top layer. This was just air bubbles in the baking as I put down a paper lining rather than a greasing, just to make getting it out easier. Anyway, you've not pretty much finished the core of the cake! Now onto decorating!
 Ok, so this is what the crumb coat looks like. You can see that I have filled up the craters with ganache, so it's alright now.
What is a crumb coat? Pretty much it's a bakers trick to make icing much easier, but trapping the actual cake under a layer of icing, so bits of crumbs don't show up when the final icing layer is done. I set this aside in the fridge for 30 minutes so it could set, and now icing will be much easier! Note: This is really only needed for big cakes where presentation is key.
 So while that is setting, I started on some more of the decorations! The top of the cake needs a plaque of sorts to write a little message on or something, and you can buy these at bakeries, and they look really pretty, but I decided for the homemade approach. This is actually a tartlet tray, but I used it because it has a push up bottom that makes it easy to lift out. Make sure to take GREAT care when lifting this out, as a piece snapped off, and as I was out of white chocolate, I just glued it back together with white write on fudge icing (you can buy this at any grocery store) and I just left it in the fridge. It seemed ok, and wasn't very noticeable.
Alrighty, so the crumb coat is out of the fridge and the final coat of ganache was placed on. It does take a while to get smooth, but I find that some knife marks actually look quite nice and add a bit of interest to the cake.
You can also see the end of a piping bag. I LOVE piping bags. A relative of mine gave me a whole bunch of cooking stuff, among them a wide variety of piping bag heads. I used a star shape for this one, for a lined effect. Circular blobs also look very nice, and can be made easily by cutting a small hole in the corner of a large zip lock bag, and piping icing out from there. Anyway, I just put them all around the base of the cake which adds a polished touch to it in the end and covers up
 the straggly bits down the bottom of the cake.
Ok you can see it here, and I've also decided to decorate it on the platter that I'm going to serve it on. I recommend this so you don't ruin any of the decoration in transferring it.
 So now just some touches are going to be put on it.
I put the seashells ontop of the cake and stood them up facing the front with little blobs of icing, as well as the ones around the side which are fixed on with more icing.
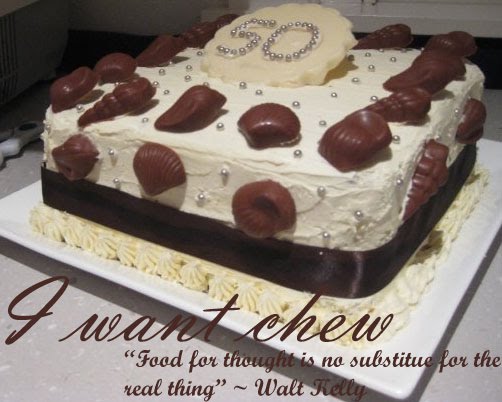
 Before I started making the cake, I had bought a chocolate coloured ribbon to tie around the end, so make sure you leave room between the blobs around the base and the seashells. This 'ties' (haha get it?) the piece together and strengthens the milk colour against the white.
I also fixed the plaque onto the top, again putting a little blob underneath it to face it towards the front.
 Cachous are so cool. I love them to death, they make any product shine :) It's really good also to add a bit of a backround interest to the layout of the cake, theyre really fun :)
(If you don't know what cachous are, I'm sure you've had them - they are the little metallic edible balls that crunch and are often put on things like cakes and baking stuff) Note: You can buy these at any supermarket in a little container, really easy to find.
Soo, I had a little touch of difficulty with the plaque. The recipe calls for me to melt milk
 chocolate and put it in a piping bag and write on it. I tried this, and unfortunately the chocolate hardened as I was squeezing it! It was pretty terrible, and I was at pretty much boiling point here, I had worked so long on it. Anyway, I thought to write out the message with white fudge write on icing, which normally wouldn't have shown up, but then I placed cachous all along the fudge so it would stick, and, lo and behold, it looked good :D
So there it is. The finished project. Production time: About 6 hours.
So, if you do want to have a crack at this recipe, email me and I'll send you the recipe, or I can just lend you the book. But you have to pretty seriously commit to it, it is a big project. I was so proud of it, and still am.
And it tasted. De-licious.

So there it is. The longest post I think I will ever make! Have a good week!
~ "Food for thought is no substitute for the real thing" - Walt Kelly
No comments:
Post a Comment